
Images
We have specific images we use for our offerings so please use those when referencing specific Allender Center events or offerings. These can be found in our Google Drive or should be already uploaded and can be found by searching the Media Libary. Blog post images are taken from Allender Center events or branded offerings, as well as stock photos from Unsplash and Adobe Stock (formerly Dollar Photo Club).
Now let’s talk about image sizes and quality. If you are uploading images to this website you should consider the size, the resolution, and the intended usage.
For information on how to upload an image to WordPress please check out the WordPress documentation.
Here’s a nice article about reducing image sizes.
Size
When we talk about the size of an image we’re talking about two things: the file size and the physical size of the image. File size is measured in bytes – kilobytes (KB) or megabytes (MB). Physical size (also known as dimensions) is measured in pixels (px). Both file size and physical size should be considered when choosing your images.
File Size
This is the most important part of preparing an image. Images with a large file size take longer to download to a visitors browser and will slow down the site. Consider the user, their patience, and their connection.
Physical Size
For this site, the widest images are the banner images and they are 1600px. It’s certainly acceptable to upload something larger, but 2000px should be the max in order to keep the file size down.
Image sizes for this site:
1600 x 350 – Banner
1200 x 1200 – Team bio
1200 x 700 – Event (event offerings, calendar) and Blog
Resolution
72 PPI (pixels per inch) for web. Period. Higher resolution images will appear just fine, they just aren’t necessary as screens can’t display anything higher than 72.
Best Practices
A few tips on using images on this site and things to keep in mind when you upload images.
Intended Usage
It’s helpful to consider how the image will be used. Will it be a small left or aligned image in a blog post? Perhaps a full width large banner image? How you intend to use an image may dictate the size of your image.
So what size should our images be?
Great question and the answer is as small (file size) as possible but not at the cost of quality and not larger (dimensions) than the constraints of our design. Also consider how the image will be used. Will it be a small left aligned image in a blog post? Perhaps a full width large banner image? As a rule of thumb, images should be no larger than 500kb (preferably ~ 150-300kb) and we shouldn’t ever need an image over 2000px wide.
Consider this scenario: You find an image on a stock photo site that would be perfect for a blog post. You download the image to your computer, upload it to the post, and publish the post. This should never happen. Why? This image, for example, is 6.3MB and is 5472×3648 pixels which is massive and complete overkill for our site. Which brings us to our next point, preparing your images for the web prior to uploading.

Preparing your image for the web
Preparing images for the web is very important and all the points above should be considered. Please use Adobe Photoshop or a similar application or better yet simply ask your web design team for help.
Naming Your Image
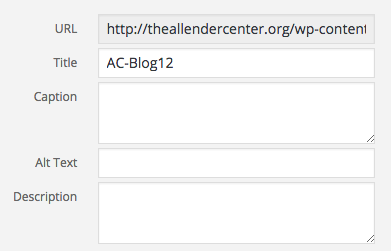
Create image names that describes the image. An image named IMG1929393.jpg tells us nothing. One reason to create an appropriate name is that the image title within WordPress is automatically generated based on the image name. It also helps when we need to search for the image within the media libary. Consider the title, based on the name, of the image and the title of the image in the screenshot. It tells us nothing about the image and we’ll likely never use this image again.
 Alt Tags
One you’ve uploaded your image you should always provide an alt tag. Not only is this good practice for SEO (search engine optimization) but it provides alternative information if a user for some reason cannot view it (because of slow connection, an error, or if the user uses a screen reader). A good rule of thumb is to describe the image and maybe even squeak in some SEO juice. Perhaps a bit wordy, but here’s a decent article on the subject.
Captions
Captions can be used to add additional information that isn’t apparent through the image or the page content. Captions are optional and should be used to enhance your content.